Uiautomator2
uiautomator2 是一个自动化测试开源工具,仅支持 android 平台的自动化测试,其封装了谷歌自带的 uiautomator2 测试框架,可以运行在支持 Python 的任一系统上,目前版本为2.10.2
开源库地址:
https://github.com/openatx/uiautomator2工作原理
引用自 https://testerhome.com/topics/11357
如图所示,python-uiautomator2 主要分为两个部分,python 客户端,移动设备
- python端: 运行脚本,并向移动设备发送
HTTP请求 - 移动设备:移动设备上运行了封装了
uiautomator2的HTTP服务,解析收到的请求,并转化成uiautomator2的代码。
整个过程
- 在移动设备上安装
atx-agent(守护进程), 随后atx-agent启动 uiautomator2 服务(默认7912端口)进行监听 - 在
PC上编写测试脚本并执行(相当于发送HTTP请求到移动设备的server端) - 移动设备通过
WIFI或USB接收到PC上发来的HTTP请求,执行制定的操作
安装与启动
在命令行工具中安装 uiautomator2
pip install pbr pip install --pre uiautomator2或者
git clone https://github.com/openatx/uiautomator2 pip install -e uiautomator2然后安装 pillow 库
pip install pillow如果安装出错,请看附录
完成
adb环境配置,参考“adb配置”用数据线连接手机,打开
USB调试功能初始化 uiautomator2
在 cmd 命令行输入
python -m uiautomator2 init或者指定单个设备
python -m uiautomator2 init --serial $SERIAL这时命令会自动安装本库所需要的设备端程序,也会在你的手机里安装两个软件一个可见一个不可见
(有图标和没图标)手动点击安装即可
控制手机
安装完成后,使用如下 python 代码查看环境是事配置成功
说明:后文中所有代码都需要导入 uiautomator2 库,为了简化我使用 u2 代替, d 代表driver
import uiautomator2 as u2

# 连接并启动
d = u2.connect()
print(d.info)能正确打印出设备的信息则表示安装成功  注意:需要安装 adb 工具,并配置到系统环境变量,才能操作手机
安装有问题可以到https://github.com/openatx/uiautomator2/wiki/Common-issues这里查看一下有没有相同的问题
安装 weditor
weditor是一款基于浏览器的 UI 查看器,用来帮助我们查看 UI 元素定位。
因为 uiautomator 是独占资源,所以当 atx 运行的时候 uiautomatorviewer 是不能用的,为了减少 atx 频繁的启停,就需要用到此工具
使用 pip 安装
pip install -U weditor查看安装是否成功
weditor --help出现如下信息表示安装成功 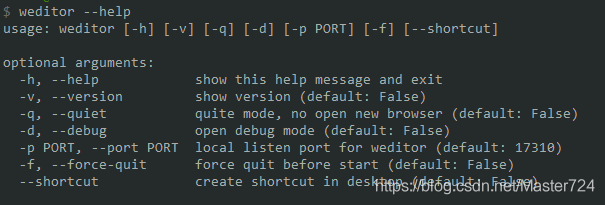
运行weditor
python -m weditor
#或者直接在命令行运行
weditor元素定位
使用方法
d(定位方式=定位值)
# 例:
element = d(text='Phone')
# 这里返回的是一个列表,当没找到元素时,不会报错,只会返回一个长度为 `0` 的列表
# 当找到多个元素时,会返回多个元素的列表,需要加下标再定位
element[0].click()
# 获取元素个数
print(element.count)支持的定位方式
ui2支持 android 中 UiSelector 类中的所有定位方式,详细可以在这个网址查看 https://developer.android.com/reference/android/support/test/uiautomator/UiSelector
整体内容如下,所有的属性可以通过 weditor 查看到
| 名称 | 描述 |
|---|---|
| text | text是指定文本的元素 |
| textContains | text中包含有指定文本的元素 |
| textMatches | text符合指定正则的元素 |
| textStartsWith | text以指定文本开头的元素 |
| className | className是指定类名的元素 |
| classNameMatches | className类名符合指定正则的元素 |
| description | description是指定文本的元素 |
| descriptionContains | description中包含有指定文本的元素 |
| descriptionMatches | description符合指定正则的元素 |
| descriptionStartsWith | description以指定文本开头的元素 |
| checkable | 可检查的元素,参数为 True ,False |
| checked | 已选中的元素,通常用于复选框,参数为 True ,False |
| clickable | 可点击的元素,参数为 True ,False |
| longClickable | 可长按的元素,参数为 True ,False |
| scrollable | 可滚动的元素,参数为 True ,False |
| enabled | 已激活的元素,参数为 True ,False |
| focusable | 可聚焦的元素,参数为 True ,False |
| focused | 获得了焦点的元素,参数为 True ,False |
| selected | 当前选中的元素,参数为 True ,False |
| packageName | packageName为指定包名的元素 |
| packageNameMatches | packageName为符合正则的元素 |
| resourceId | resourceId为指定内容的元素 |
| resourceIdMatches | resourceId为符合指定正则的元素 |
子元素和兄弟定位
子元素定位
child()
#查找类名为 `android.widget.ListView` 下的 `Bluetooth` 元素
d(className="android.widget.ListView").child(text="Bluetooth")
# 下面这两种方式定位有点不准确,不建议使用
d(className="android.widget.ListView").child_by_text("Bluetooth", allow_scroll_search=True)
d(className="android.widget.ListView").child_by_description("Bluetooth")兄弟元素定位
sibling()
#查找与 `google` 同一级别,类名为 `android.widget.ImageView` 的元素
d(text="Google").sibling(className="android.widget.ImageView")链式调用
d(className="android.widget.ListView", resourceId="android:id/list")
   .child_by_text("Wi‑Fi", className="android.widget.LinearLayout")
   .child(className="android.widget.Switch")
.click()相对定位
相对定位支持在left, right, top, bottom,即在某个元素的前后左右
d(A).left(B),  # 选择 `A` 左边的B
d(A).right(B),  # 选择 `A` 右边的B
d(A).up(B),  # 选择 `A` 上边的B
d(A).down(B),  # 选择 `A` 下边的B
# 选择 WIFI 右边的开关按钮
d(text='Wi‑Fi').right(resourceId='android:id/widget_frame')元素常用API
表格标注有@property装饰的类属性方法,均为下方示例方式
d(test="Settings").exists| 方法 | 描述 | 返回值 | 备注 |
|---|---|---|---|
| exists() | 判断元素是否存在 | True,Flase | @property |
| info() | 返回元素的所有信息 | 字典 | @property |
| get_text() | 返回元素文本 | 字符串 | |
| set_text(text) | 设置元素文本 | None | |
| clear_text() | 清空元素文本 | None | |
| center() | 返回元素的中心点位置 | (x,y) | 基于整个屏幕的点 |
exists 其它使用方法:
d.exists(text='Wi‑Fi', timeout=5)info()输出信息:
{
   "bounds": {
      "bottom": 407,
      "left": 216,
      "right": 323,
      "top": 342
   },
   "childCount": 0,
   "className": "android.widget.TextView",
   "contentDescription": null,
   "packageName": "com.android.settings",
   "resourceName": "android:id/title",
   "text": "Wi‑Fi",
   "visibleBounds": {
      "bottom": 407,
      "left": 216,
      "right": 323,
      "top": 342
   },
   "checkable": false,
   "checked": false,
   "clickable": false,
   "enabled": true,
   "focusable": false,
   "focused": false,
   "longClickable": false,
   "scrollable": false,
   "selected": false
}可以通过上方信息分别获取元素的所有属性
XPATH 定位
因为 Java uiautoamtor 中默认是不支持 xpath ,这是属于 ui2 的扩展功能,速度会相比其它定位方式慢一些
在 xpath 定位中, ui2 中的description 定位需要替换为 content-desc ,resourceId 需要替换为 resource-id
使用方法
# 只会返回一个元素,如果找不到元素,则会报 `XPathElementNotFoundError` 错误
# 如果找到多个元素,默认会返回第 `0` 个
d.xpath('//*[@resource-id="com.android.launcher3:id/icon"]')

# 如果返回的元素有多个,需要使用 `all()` 方法返回列表
# 使用 `all` 方法,当未找到元素时,不会报错,会返回一个空列表
d.xpath('//*[@resource-id="com.android.launcher3:id/icon"]').all()设备交互
单击
d(text='Settings').click()
#单击直到元素消失,超时时间 `10` ,点击间隔1
d(text='Settings').click_gone(maxretry=10, interval=1.0)长按
d(text='Settings').long_click()拖动
Android<4.3时不能使用拖动
# 在 `0.25S` 内将 `Setting` 拖动至 `Clock` 上,拖动元素的中心位置
# duration默认为0.5,实际拖动的时间会比设置的要高
d(text="Settings").drag_to(text="Clock", duration=0.25)

# 拖动 `settings` 到屏幕的某个点上
d(text="Settings").drag_to(877, 733, duration=0.25)

#两个点之间的拖动,从点 `1` 拖动至点2
d.drag(x1, y1, x2, y2)滑动
滑动有两个,一个是在 driver 上操作,一个是在元素上操作
元素上操作
从元素的中心向元素边缘滑动
# 在 `Setings` 上向上滑动。 `steps` 默认为10
# 1步约为 `5` 毫秒,因此 `20` 步约为0.1 s
d(text="Settings").swipe("up", steps=20)driver上操作
即对整个屏幕操作
# 实现下滑操作
x, y = d.window_size()
x1 = x / 2
y1 = y * 0.1
y2 = y * 0.9
d.swipe(x1, y1, x1, y2)driver滑动的扩展方法,可以直接实现滑动,不需要再自己封装定位点
# 支持前后左右的滑动
# "left", "right", "up", "down"
# 下滑操作
d.swipe_ext("down")双指操作
android>4.3
对元素操作
d(text='Settings').gesture(start1, start2, end1, end2, )
# 放大操作
d(text='Settings').gesture((525, 960), (613, 1121), (135, 622), (882, 1540))封装好的放大缩小操作
# 缩小
d(text="Settings").pinch_in()
# 放大
d(text="Settings").pinch_out()等待元素出现或者消失
# 等待元素出现
d(text="Settings").wait(timeout=3.0)
# 等待元素消失,返回True False,timout默认为全局设置的等待时间
d(text='Settings').wait_gone(timeout=20)滚动界面
设置 scrollable 属性为 True
滚动类型:horiz 为水平 vert 为垂直
滚动方向:forward 向前
backward 向后
toBeginning 滚动至开始
toEnd 滚动至最后
to 滚动直接某个元素出现
所有方法均返回 Bool 值
# 垂直滚动到页面顶部/横向滚动到最左侧
d(scrollable=True).scroll.toBeginning()
d(scrollable=True).scroll.horiz.toBeginning()
# 垂直滚动到页面最底部/横向滚动到最右侧
d(scrollable=True).scroll.toEnd()
d(scrollable=True).scroll.horiz.toEnd()
# 垂直向后滚动到指定位置/横向向右滚动到指定位置
d(scrollable=True).scroll.to(description="指定位置")
d(scrollable=True).scroll.horiz.to(description="指定位置")
# 垂直向前滚动(横向同理)
d(scrollable=True).scroll.forward()
# 垂直向前滚动到指定位置(横向同理)
d(scrollable=True).scroll.forward.to(description="指定位置")
# 滚动直到 `System` 元素出现
d(scrollable=True).scroll.to(text="System")


im = d(text="Settings").screenshot()
im.save("settings.jpg")输入
输入自定义文本
# 使用 `adb` 广播的方式输入
d.send_keys('hello')
# 清空输入框
d.clear_text()输入按键
两种方法
# 发送回车
d.press('enter')
# 第二种
d.keyevent('enter')

d.press('back')
d.press('home')目前 press 支持的按键如下
"""
        press key via name or key code. Supported key name includes:
            home, back, left, right, up, down, center, menu, search, enter,
            delete(or del), recent(recent apps), volume_up, volume_down,
            volume_mute, camera, power.
"""keyevent是通过“adb shell input keyevent”方式输入,支持按键更加丰富
更多详细的按键信息https://developer.android.com/reference/android/view/KeyEvent.html
输入法切换
# 切换成 `ui2` 的输入法,这里会隐藏掉系统原本的输入法,默认是使用系统输入法
# 当传入 `False` 时会使用系统默认输入法,默认为Fasle
d.set_fastinput_ime(True)
# 查看当前输入法
d.current_ime()
#返回值
('com.github.uiautomator/.FastInputIME', True)模拟输入法功能
可以模拟的功能有 go ,search ,send , next , done ,previous
如果使用 press 输入按键无效,可以尝试使用此方法输入
# 搜索功能
d.send_action("search")toast操作
# 获取toast,当没有找到 `toast` 消息时,返回 `default` 内容
d.toast.get_message(timout=5, default='no toast')
# 清空 `toast` 缓存
d.toast.reset()监控界面
使用 watcher 进行界面的监控,可以用来实现跳过测试过程中的弹框
当启动 watcher 时,会新建一个线程进行监控
可以添加多个 watcher
用法
# 注册监控,当界面内出现有 `allow` 字样时,点击allow
d.watcher.when('allow').click()

# 移除 allow 的监控
d.watcher.remove("allow")

# 移除所有的监控
d.watcher.remove()

# 开始后台监控
d.watcher.start()
d.watcher.start(2.0)  # 默认监控间隔2.0s

# 强制运行所有监控
d.watcher.run()

# 停止监控
d.watcher.stop()

# 停止并移除所有的监控,常用于初始化
d.watcher.reset()多点滑动
这里可以用来实现图案解锁
使用 touch 类
# 模拟按下不放手
touch.down(x,y)
# 停住3S
touch.sleep(x,y)
# 模拟移动
touch.move(x,y)
# 模拟放开
touch.up(x, y)
#实现长按,同一个点按下休眠 `5S` 后抬起
d.touch.down(252, 1151).sleep(5).up(252, 1151)
# 实现四点的图案解锁,目前只支持坐标点
d.touch.down(252, 1151).move(559, 1431).move(804, 1674).move(558, 1666).up(558, 1666)附录
安装出错解决方案
如果出现以下错误,
      File "c:\users\admini~1\appdata\local\temp\pip-install-5d_qv9h6\uiautomator2_c872ed000f1342e28f7b912ce373b201\.eggs\pbr-5.5.1-py3.6.egg\pbr\git.py", line 58, in _run_shell_command
        return out[0].strip().decode('utf-8', 'replace')
    AttributeError: 'str' object has no attribute 'decode'
    ----------------------------------------
ERROR: Command errored out with exit status 1: python setup.py egg_info Check the logs for full command output.又或者是下面错误则是因为一个库的问题。
      File "d:\anaconda3\lib\site-packages\pbr\git.py", line 83, in _git_is_installed
        _run_shell_command(['git', '--version'])
      File "d:\anaconda3\lib\site-packages\pbr\git.py", line 58, in _run_shell_command
        return out[0].strip().decode('utf-8', 'replace')
    AttributeError: 'str' object has no attribute 'decode'
    ----------------------------------------
ERROR: Command errored out with exit status 1: python setup.py egg_info Check the logs for full command output.先安装一下prb
pip install pbr然后将prb 源码中的,第 58 句源码修改一下
return out[0].strip().decode('utf-8', 'replace')

# 改为

return out[0].strip()adb配置
设备需求
安卓手机
数据线
电脑
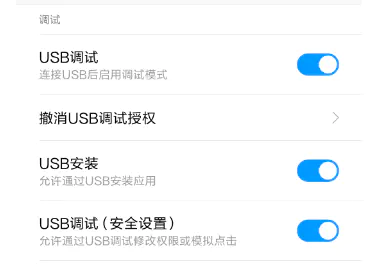
1. 打开手机 USB 调试模式
打开手机的开发者选项,本人小米手机,系统android 7.0(miui 9.1),设置->我的设备->全部参数 ( 点击 miui 版本 5 次,即可开启开发者模式)
设置->更多设置 ( 倒数第三个就是开发者选项)->开启 USB 调试,使用数据线连接手机和电脑
新版的 MIUI 需要同时打开“USB调试(安全设置)”,否则不能进行点击;如果需要通过电脑安装 apk ,则还需要打开“USB安装”选项。
2. 电脑配置 adb 环境
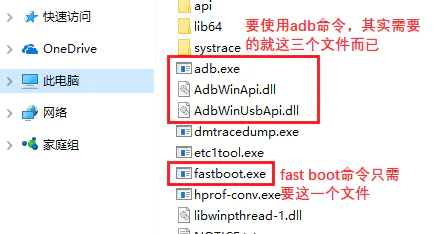
打开 Android 开发网,搜索“SDK Platform Tools”,打开如下所示的网站,可以看到有Windows\Mac\Linux三个版本的SDK Platform Tools,点击符合你电脑的版本下载它。 adb 工具就包含在这个工具中。
SDK Platform Tools下载后,在“platform-tools”路径下可以看到图示三个 adb 相关的文件。现在需要将这个路径添加到系统环境变量中。
下载地址:https://developer.android.google.cn/studio/releases/platform-tools#downloads

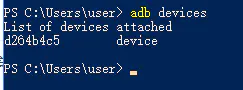
最后连接手机,打开 USB 调试后,在命令行对话框输入 adb devices。显示设备列表,则配置完成
连接手机的两种方法
设备连接方法,有两种
通过
WiFi,假设设备IP 192.168.5.4 和您的PC在同一网络中pythonimport uiautomator2 as u2 d = u2.connect('192.168.5.4') # alias for u2.connect_wifi('192.168.5.4') print(d.info)通过
USB, 假设设备序列是123456789F(见adb devices)pythonimport uiautomator2 as u2 d = u2.connect('123456789F') # alias for u2.connect_usb('123456789F') print(d.info)