Label 组件
Label 组件是用于在界面上输出文本内容的标签,在 tkinter 的 ui 界面编写中往往是使用得最多的一种,它的使用方式也多种多样下面我们来讲解 label 的使用。

python
import tkinter as tk

#  导入 tkinter 模块的所有内容
root = tk.Tk()
root.geometry("200x100+150+150")

#  创建一个文本 Label 对象
textLabel = tk.Label(root, text="学 tkinter 就找正心")
textLabel.pack(side=tk.LEFT)

root.mainloop()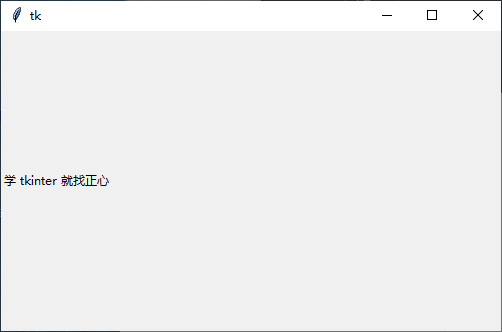
基本用法与可选属性
(1). 基本用法
基本用法:Label(根对象, [属性列表])
根对象:在那个窗体显示,例如主窗体。
属性列表:是可选的属性=属性值组成。
(2). 可选属性
| 属性 | 说明 |
|---|---|
| text | 标签显示的文本 |
| font | 设置文本的字体和大小 |
| fg(foreground) | 字体的颜色, |
| bg (background) | 标签的背景色 |
| width | 标签的宽度(一个中文的字体宽为单位) |
| height | 标签的高度(一个中文的字体高为单位) |
| padx | 文字到边框的距离,水平方向 |
| pady | 文字到边框的距离,垂直方向 |
| bd(borderwidth) | 边框的宽度 |
| relief | 边框的样式 |
| justify | 文本对齐方式 |
| image | 图片 |
| compound | 图片与文字的混搭 |
| anchor | 方位 |
可选属性的具体应用
常用属性
text
python# 用于显示文本内容 text = "要显示的文本内容"font
python# 用于设置字体与字体大小 # 用法:font=("字体名",大小) font=("宋体",24)fg 与 bg
python# fg 前景色,即字体的颜色,bg 背景颜色 可用英文名,也可以用十六进制表示的颜色。 fg="red", fg="#00ffff"width 与 height
python# width height 标签的宽度与高度,都是以系统默认的中文的一个字体宽高为单位 width=20, height=5
案例
python
import tkinter as tk

# 导入 tkinter 模块的所有内容
root = tk.Tk()
root.geometry("500x300+150+150")

# 创建一个文本 Label 对象
textLabel = tk.Label(root,
                     text="学 tkinter 就找正心",  # 设置文字属性
                     font=("宋体", 24),  # 设置字体
                     fg="red",  # 前景色
                     bg="#00ffff",  # 背景色
                     width=30,  # 宽度
                     height=5)  # 高度
textLabel.pack(side=tk.LEFT)

root.mainloop()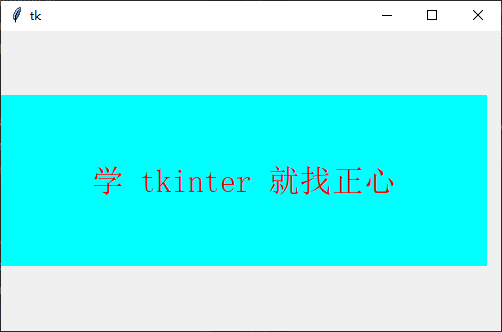
背景/前景/宽高
代码:
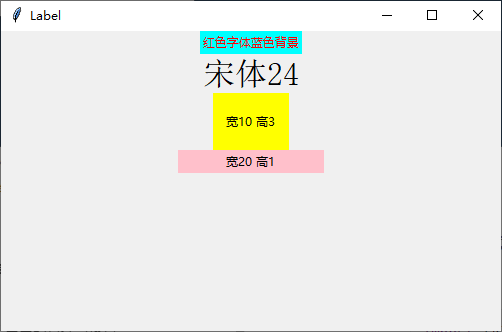
python
import tkinter as tk

#  背景色与前景色
root = tk.Tk()
label_1 = tk.Label(root, text='fg="red" bg="#00ffff""', fg="red", bg="#00ffff")
label_1.pack()

#  字体与字体的大小
label_2 = tk.Label(root, text='font=("宋体", 24)', font=("宋体", 24))
label_2.pack()

#  宽度与高度
label_3 = tk.Label(root, text='宽 10 高 3', bg="yellow", width=10, height=3)
label_3.pack()
label_4 = tk.Label(root, text='宽 20 高 1', bg="yellow", width=20, height=1)
label_4.pack()

root.mainloop()演示效果:
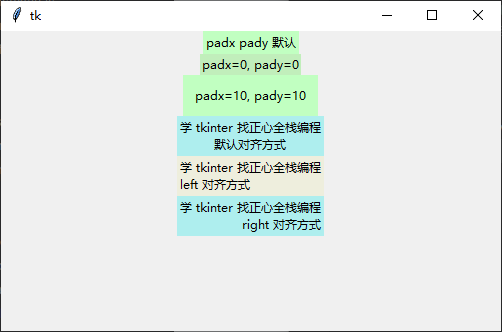
边距/对齐方式
边距:padx 与 pady
python
#  文字到边框的距离 padx 与 pady 水平与竖直方向,单位是像素,默认是 1 像素
padx = 2, pady = 1文本对齐方式:justify
python
#  可取 "left" ,"right", "center" ,默认是"center"居中对齐,Label 里的文本支持 转移字符 \n \t 等
justify = "left"案例代码:
python
import tkinter as tk

root = tk.Tk()
root.geometry("500x300+150+150")

#  边距
label_5 = tk.Label(root, text='padx pady 默认', bg="#c1ffc1")
label_5.pack()
label_6 = tk.Label(root, text='padx=0, pady=0', bg="#c1eebb", padx=0, pady=0)
label_6.pack()
label_7 = tk.Label(root, text='padx=10, pady=10', bg="#c1ffc1", padx=10, pady=10)
label_7.pack()

#  对齐方式
label_8 = tk.Label(root, text="学 tkinter 找正心全栈编程\n默认对齐方式", bg='#aeeeee')
label_8.pack()
label_9 = tk.Label(root, text="学 tkinter 找正心全栈编程\nleft 对齐方式", justify="left", bg='#eeeedd')
label_9.pack()
label_9 = tk.Label(root, text="学 tkinter 找正心全栈编程\nright 对齐方式", justify="right", bg='#aeeeee')
label_9.pack()

root.mainloop()效果演示:
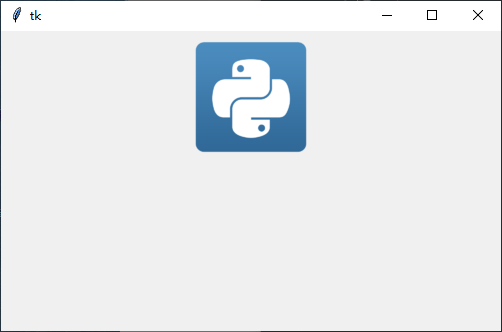
label 添加图片
提示
图片内容
仅图片
python
#  导入图片
img1 = tk.PhotoImage(file="文件路径/01.png")
#  在标签里放入图片
label_image1 = tk.Label(root, image=img1)
# 注:目前支持 .png 与 .gif 格式,还不支持 .jpg 格式代码:
python
import tkinter as tk

#  导入 tkinter 模块的所有内容
root = tk.Tk()
root.geometry("500x300+150+150")

#  创建一个文本 Label 对象
#  导入图片
img1 = tk.PhotoImage(file="image1.png")
#  在标签里放入图片
label_image1 = tk.Label(root, image=img1)
label_image1.pack()
#  进入消息循环,显示窗口
root.mainloop()演示效果
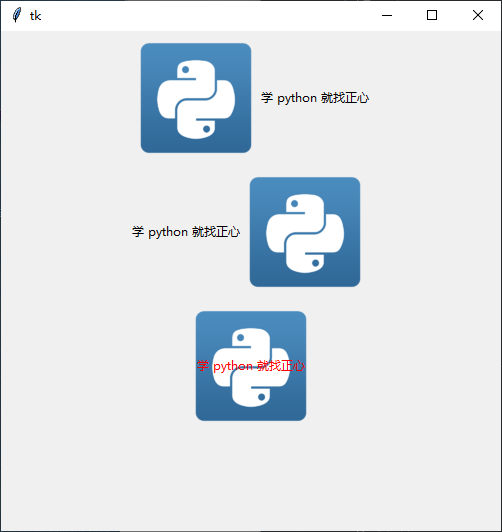
图片与文字混合
使用 text 正常添加文字并使用 compound 设置对齐,对齐方式有:'left', "right", "center"
python
compound = "left"代码:
python
import tkinter as tk

#  导入 tkinter 模块的所有内容
root = tk.Tk()
root.geometry("500x500+150+150")

img1 = tk.PhotoImage(file="image1.png")
label_image1 = tk.Label(root, text="学 python 就找正心", image=img1, compound="left")
label_image1.pack()

label_image2 = tk.Label(root, text="学 python 就找正心", image=img1, compound="right")
label_image2.pack()

label_image3 = tk.Label(root, text="学 python 就找正心", image=img1, compound="center", fg="red")
label_image3.pack()

root.mainloop()演示效果:
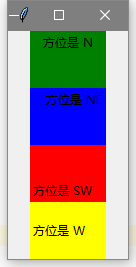
设置文字在标签框内的方位
python
#  可选的参数有:"e","w","s","n","ne","se","nw","sw",就是东西南北八个方向
anchor = "n"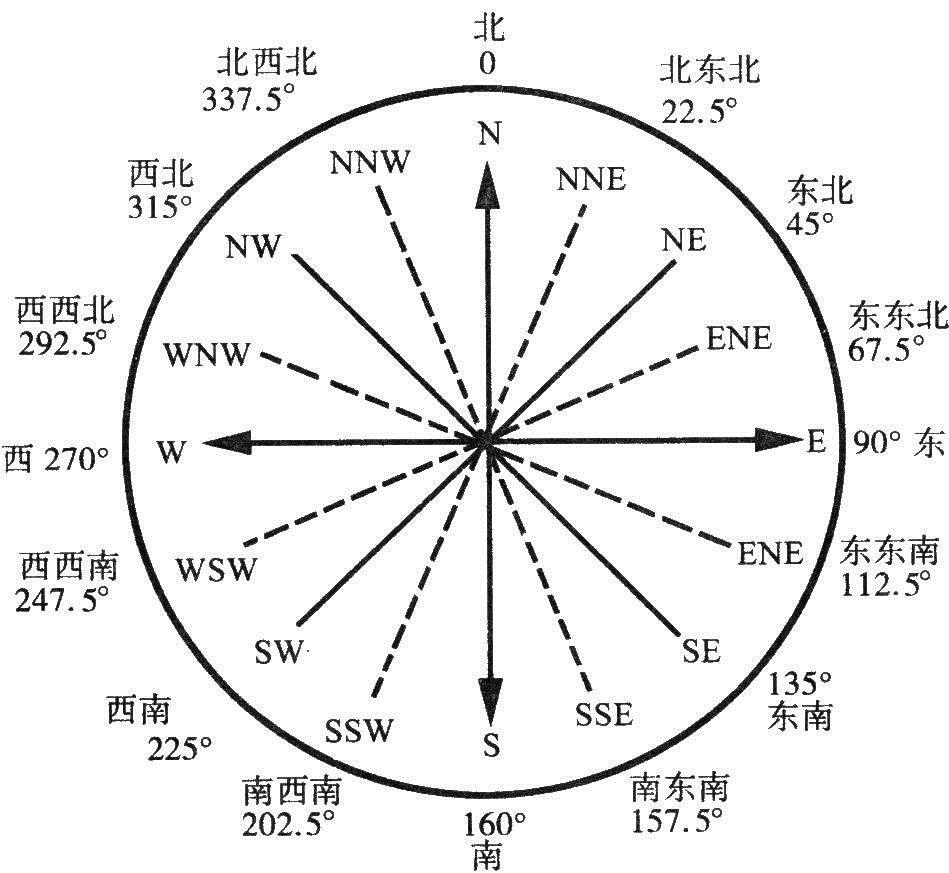
代码:
python
import tkinter as tk

root = tk.Tk()

label_1 = tk.Label(root, text="方位是 N", bg="green", width=10, height=3, anchor="n")
label_1.pack()

label_2 = tk.Label(root, text="方位是 NE", bg="blue", width=10, height=3, anchor="ne")
label_2.pack()

label_3 = tk.Label(root, text="方位是 SW", bg="red", width=10, height=3, anchor=tk.SW)
label_3.pack()

label_4 = tk.Label(root, text="方位是 W", bg="yellow", width=10, height=3, anchor=tk.W)
label_4.pack()

root.mainloop()演示效果:
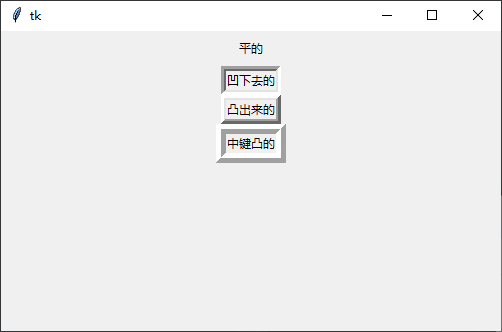
边框的样式与宽度
python
#  relief 表示边框样式,可选的参数有:
#       flat(平的),
#       sunken(沉没的,凹下去的),
#       raised(提高,凸出来的),
#       ridge(脊,中间凸的),
#       默认是 flat.
relief = "sunken"代码:
python
import tkinter as tk

root = tk.Tk()

#  默认 flat 平的
label_1 = tk.Label(root, text='flat 平的', bd=8)
label_1.pack()

#  sunken 沉没的
label_2 = tk.Label(root, text='sunken 沉没的', relief="sunken", bd=5)
label_2.pack()

#  raised 提高
label_3 = tk.Label(root, text='raised 提高', relief="raised", bd=5)
label_3.pack()

#  ridge 脊
label_4 = tk.Label(root, text='ridge 脊', relief="ridge", bd=10)
label_4.pack()

root.mainloop()演示效果: